
Authorize.net is one of the most popular payment gateways in the U.S. Rezgo has integrated with the Authorize.net Advanced Integration Method (AIM). This integration allows your customers to pay directly through your Rezgo site and through the Rezgo POS/Back office booking.
Authorize.net Integration Features
- Card Not Present/MOTO Transactions: Yes
- Preauthorization: Yes
- Refunds: Yes
- 3D Secure Support: No
- EMV Terminal Connection Through Rezgo: No*
*You can still take payment for Rezgo bookings with payment terminals. Learn how here or talk to our team for details.
Sign up with Authorize.net
If you need to accept credit cards for your business, sign up for a merchant account with Authorize.net
Set-up Your Credentials
Before you can connect your Authorize.net gateway to your Rezgo account, you must create an API Login ID and Transaction Key in your Authorize.net settings.
Once you have an account with Authorize.net, you’ll need to obtain values for these fields:
- API Login ID
- Transaction key
To create a login ID and transaction key, follow these steps:
- Log in to your Merchant Interface at https://account.authorize.net
- Click Settings in the main left side menu.
- Click API Login ID and Transaction Key.
- Under Create New Transaction Key, enter your Secret Answer.
- Click Submit.
Required Settings
The Authorize.net gateway requires some configuration before it can be used with Rezgo. First, because of the international nature of Rezgo bookings, the system does not support AVS. However, the system does support CVV. In order for the payment gateway to work properly with your Authorize.net account, you must update your Authorize.net settings with the following:
- Enable CVV
- Disable AVS (see instructions below)
- Use your API Login ID and create a Transaction Key. (these are used in your payment gateway configuration settings on Rezgo).
- In the “Direct Response” section of the settings, be sure to set the default delimiter as a “|” Pipe and set the encapsulator to blank.
To disable AVS:
- Go to “Settings” then “Address Verification Settings”
- Remove any checkboxes next to “Reject Transaction”.
If your account has some required fields set, you might need to make some changes. To see what you have required, go to:
Account->Settings->Payment Form->Form Fields
To get to this page:
1. Log into your Merchant Interface at https://account.authorize.net
2. Click Settings link on the left under Accounts.
3. Click Payment Form under the Transaction Format Settings heading.
4. Click Form Fields.
Under no circumstance can the Card Code be required. If this option is checked your payments will fail.

Before adding your credentials to Rezgo, you must set your Authorize.net account to Live. Rezgo will not connect to your account if it is in TEST MODE.
Attach the Gateway to Rezgo
Copy and paste this information into your Rezgo account by following these instructions:
1. Go to Settings in the main menu and click Accept Payments.
2. Click Use a Merchant Gateway (1) and then Attach Merchant Gateway (2).

3. Select Authorize.net from the list of supported gateways.
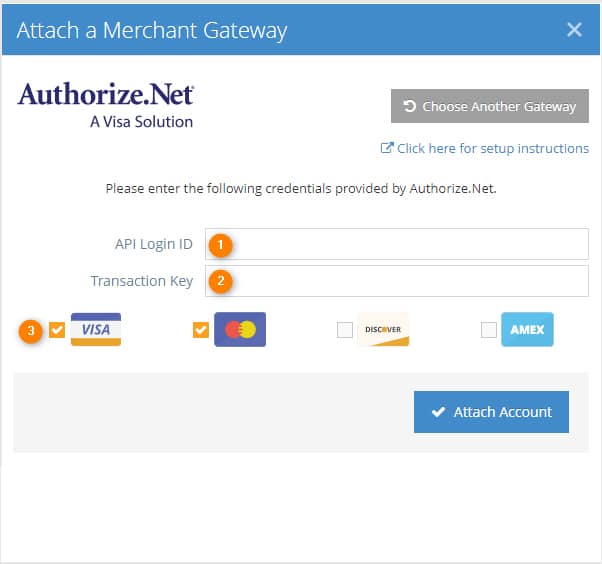
4. Enter your API Login ID (1) and Transaction Key (2) in the spaces provided. Select the credit cards you wish to accept (3).
5. Click Attach Account .
If successful, the system will show the following success message:
